Thursday, October 25, 2012

Home Ec Lesson: Easy Sugar Skulls

After lots of requests from my fabulous Bridal Clients for sugar skull inspired accessories, I've grown a real fondness for these charming mementos. 


History:  These little treats were developed as part of the Latin tradition of Dia de Los Muertos, when spirits of deceased children are able to revisit their families one night a year - Oct 31st.   Learn the whole story here.

Try It:  This year, after an inspiring trip Mexican Town in Detroit, I decided to make my own.  So, with my little collection of sugar (and clay) skulls looking on it gave it a try!


It turns out, it's easier then it looks! With a good mold, and a bit of patience, it's actually a pretty easy project.  Absolutely something that could be easily done with children!


How To:  My mold came with a very simple recipe that boils down to a ratio:  For each cup of sugar, use one teaspoon or of water, and one teaspoon of meringue powder.  I made a five cup batch and actually included  an egg white instead of water.   Call me crazy, but I'm going to assume that when this tradition was developed the people making the skulls probably didn't have access to meringue powder.


Since I knew we wouldn't be eating them, I'm not too worried about the raw egg white.  Mix your ingredients to the consistency of wet sand, and you're ready to go.  (The instructions explain that when you squeeze a handful your fingerprints should remain - an indicator of proper consistency.)


I filled each mold pressing the 'dough' deeply into the corners and details.  When flipping them out take a square or parchment paper and a small cardboard square (I used cereal box) and cover the back of the skull.  Flip the mold and the skull should slip onto your parchment.  (Some tapping on the 'face' of the skull is required.)  Carefully slide the parchment square onto a baking sheet or cutting board where the skulls will sit to dry.   The sugar should be allowed to try for 8 hours or more as necessary.  (Humid days or the larger skulls would require more time.)    I slid my trays of skulls into the oven on the 'keep warm' setting to speed dry time.


Decorate!  Each skull can be decorated with royal icing and a tiny piping tip.  You can find lots of inspiration photos online that will include sequins, beads, and more.   I'll be decorating this batch with a group of gals at a 'Sugar Skull Party' this evening.  Photos to come!

Use: If you omit my egg-white addition to the recipe, the pieces would be edible if handled and decorated with clean hands throughout the process.  They'll taste like raw sugar, but would be cute additions to a tea or coffee service at an Autumn party.   I prefer to use them in a decorative way.  They are too cute to destroy!


TRY IT:  Resources, Molds, and Recipes are available here.  


Saturday, October 20, 2012

No Guts No Glory - Another Halloween Decoration DIY

While working on several Halloween decorations this week, two of my 'failed' attempts yielded some great techniques that I thought were worth sharing.  To quote Deepak Shopra, "There are no accidents... there is only some purpose that we haven't yet understood".

So, while I was trying to make a full moon, I discovered how to make
DIY Organs and Intestines for your 
Zombie Halloween Party!

This project is two-fold.  First you'll see how to make a 'disc of intestines' and I'll also show you how to create internal organs using a similar process.

Materials:
Balloons:  Red, Blue, or White, but anything you have around will work.
String:  Ribbon can also be used, but rough string or twine gives that 'hasty home surgery' look.
Scissors:  Junky ones.  Great opportunity to use "throw away" dollar store scissors, cause you might have to pitch them. 
Spray Paint:  Red, Blue, Black, Silver, Gray, or any combo of those.   Glossy Preferred.
Spritz Bottle:  Filled with water. 
Expanding Foam Insulation:  Use leftovers after an Autumn Weather proofing project, or buy a can.
Round Mold:  I used a section of cardboard tube originally intended for concrete footings. (You can find it near the concrete in a Home Improvement store. $9)  We already had the tube at home for a costume, so I cut off a hunk, but really anything would work.  See notes below. 


Step 1:  Gather Materials
The spray foam grows like The Blob, and sticks to anything in sight, so be prepped.  Cut several lengths of string to tie off the balloons, set the mold of your choosing out on some scrap paper,  and wear gloves.   Be sure to follow all safety instructions on the foam, but most importantly, USE GLOVES - this stuff will NOT wash off your hands for several days.  You can use acetone to clean up sticky scissors, but after it's dry, it's a lost cause.

Step 2. Intestine Mold
As I mentioned I used a short length of LARGE cardboard tube from the concrete isle in the hardware store.  The inside is waxy, so after the foam dried I was able to remove it from the form.  If your form is NOT waxy be sure to line it with a layer of paper or cling wrap, etc.  If you are boldly using a spring form pan for this task - line it a zillion times!   You can create your own amorphous shape from cardboard for a more imperfect organic look. (Still needs to be lined so it's not stuck to the form forever.) Set your form on a sheet of scrap paper (newspaper) and begin to fill the mold using the straw provided with the foam.  As you fill the form, think like an intestine.  Circular thin lines of foam give a great look.  Remember, this Blob will 'grow' as it's exposed to air, start with thin lines.  When you lines have grown to your desired thickness you can mist the foam with a bit of water to stop it's "growth".  (Image below.)


Step 3:  Organ Forms
The basic goal is to fill a balloon with foam, like you would fill a water balloon.  Fill the balloon using the straw provided with the spray foam to about 2/3 to 3/4 of the ultimate desired organ size.  Remember, variety in size and shape helps things to look natural.  Slide the balloon on the straw and loosely tie a basic overhand knot around the mouth of the balloon.  (Hint: That's just the very first part of tying your shoes, before you make the bunny ears. :)  Having the knot in place before you press the trigger really helps for an easy tie-off once the Blob starts growing.  Fill the balloon with foam ALLOWING THE GAS TO ESCAPE as much as possible, but containing the foam.   Slide the balloon off the straw and tie it off - TIGHT!


Step 4:  Allow to Dry
Keep an eye on this stuff - seriously.  You think it's done growing and leave it alone and you come back and it has doubled in size.  Once it's grown to the size/shape you like, spritz with water to slow growth.  The foam in the balloons will dry MUCH more slowly then that in the open form.  I assume that's a lack of oxygen situation.  After about 2-3 hours you will feel that it has started to firm up, but had not set hard.  When that happens, WHILE THE BALLOONS ARE STILL PLIABLE proceed to the next step.


Step Five:  Cut the Organs
Using CHEAP scissors, cut a slit in each 'organ' and allow some of the foam to ooze out.  (It's SO HALLOWEEN-Y to do!)  If you want more ooze, cut a larger slit, if you want to slow the growth, spritz with water.  I found that slits about 1" long allowed enough flow to get nice "lumps" but not SO much ooze that the balloon emptied or the lumps left the balloon all together.  Getting nice lumpy orbs is very much a surface tension thing.  Lots of factors (temp, dry time, humidity, etc) probably play a roll in this, so play it by ear.

Step 6:  Paint
Layering paint is the trick here.  Lots of DEEP red tones (think Cranberry not Barn red) and mix in some darker tones.  I used deep blue, but black or mahogany would work well too.  For the intestines I started with a layer of silver (I was TRYING to make a moon - FAIL!) and that added some interesting depth.   I layered the colors while the paint was still wet which allowed for nice blend and bleed among the layers of color.  You can play with it.  The best part is that pesky spray paint drip marks DON'T MATTER!  They just look like dripping blood or veins, etc.   Gloss gives them a nice wet look, achievable with glossy paint, or a high gloss modge-podge finish over the paint.


Step 7: Display
In the photos below I layered my organs in a shallow dish with blue glass vase filler (dollar store) so they looked like they were sitting on ice.  I've about hit my gore limit with the organ's themselves, but you gory Halloween types could use fake blood in your display to amp up the yuck factor.  I happen to  have a Mad Scientist's laboratory display so I'll slip a few in apothecary jars as well.

For the intestines, I think setting them on a cake stand with a slice cut out at a zombie party would be SUPER yucky cool, but be sure you guests don't eat your fabulous new props!
ENJOY! 

PS:  Failures:  The intestines were a failed moon attempt.  I was hoping the foam would create a big mushroom over the form.  It was a VERY damp rainy day when I did this, so the growth was a bit inhibited I think - Could work in the future.  The intestines were actually failed attempts at cheap ghost heads (that would save me a trip to the craft store) - I didn't think through that the foam doesn't GROW when not exposed to air (ie: in a balloon) so my anticipated big round foam heads turned out to be limp balloons.  After a couple of hours I got tired of waiting so I cut into one to see what the holdup was and VOILA.  :)  


Speaking of Spiders.. My Spider Inspired DIY Halloween Display

If you've read my last few posts you will have learned that in our one room school house spiders present a constant battle, particularly as the weather turns cool, and especially as we reclaimed the house from the mountain of overgrown weeds and ivy outside.

While I HATE being startled by spiders outside, and the thought of spiders inside gives me goosebumps, I must have been inspired by the little beasts, because spiders have played a major role in my Halloween decorations this year.   Below I'll show YOU how to create a fabulous spider display centered around a VERY spooky cocooned figure.

These spiders have just claimed a human victim, and have wrapped him up for a Halloween Feast!

Recreate this scene in your home by following these simple steps: 


1: Gather Materials:  
- Human Figure:  I used a dress form.  You could also use a few pillows or a roll of foam bound to create the look of a narrow waist, etc.
- Tulle Netting:  I had a roll of white tulle left over from some wedding decor.  This is an inexpensive purchase at the fabric shop, or you could use old drapery sheers, thin white fabric, cotton muslin, etc.
- Batting:  Use left over pillow fill,  batting scraps, or synthetic 'snow' from your holiday display.  Anything fluffy and white will work.
- Synthetic Spider Web:  Be sure to get the kind that can be spread into a full 'sheet' of web.  If you've purchased a bag that ends up being all short cuts of web, you can use that in place of the batting.
- Fishing Line
-Spiders:  Large spiders add drama and make the actual takedown of a human more believable, but a swarm of small spiders crawling on the body looks great too.

2. Prep the Body:  If your dressform is a bright color you may want to cover it in a neutral fabric to allow for a white spider sack.  Another approach would be dressing the form in tattered clothing.  I might try this look next year.  IF you plan to use this piece outside, think in terms of styrofoam or another rain resistant material. 

3.  Cut Your Netting:  Add the height of your torso and the distance you would like the body to hang to determine the overall length of the web sack.  Double this distance to determine the amount of tulle you will need.  Lay your length of fabric across your work surface and center your body within the length.  Please note:  I chose to hang my headless body upside down in the sack, so in my case the shoulders of my form align with the center of my piece of fabric.  You can face your 'dummy' in whichever direction the unlucky fellow wants to hang.  I've used tulle here because I like the look of lots of layers of sheer fabric in the finished piece.  The sheer tulle allows the figure's silhouette to show clearly when back-lit.  If you have a somewhat lumpy dummy, conceal the shape by using an opaque fabric at this step. 

4.  Add Batting:  You'll see that I used a combination of some fake snow from a holiday display AND the 'short cut' web material I mentioned in the materials list.  This was a dollar store purchase and I thought it was a waste, but I've finally found a use for it.   I like to add lots of batting at the bottom of the sack.  This helps create the classic teardrop shape in your finished piece. 

5.  Wrap Him Up:  After you've layered fluff onto the dummy, fold the second half of the sheer fabric up over the figure.  The two raw ends of the fabric will align at the top of the sack, and the fold will be at the very bottom of the sack.

6.  Twist:  A single width of fabric should be suffiicent to wrap around the side of the body.  To add bulk to the most visable side of the sack, I wrapped the side of the body and tiwsted the excess toward the front of the figure.  Work in terms of twisting as opposed to folding - it allows for a more organic shape in the end.  Once your body is covered gather the raw ends of the tulle into a bundle, securing it with a scrap of extra fabric.  Your body will hang from the tie you create at the end, so be sure this point is secure. 

7.  Add the Web:  It wouldn't be a spider's victim without the webbing!   Open your package of webbing and unroll the sheet to it's full length.  It will be a bit like a long sausage at this point.  Working on a large flat surface spearing the 'rope' into a wispy web look.   Remember this is a spider web and not a winter wonderland - stretch fluffy areas into sheer whispy strands.

8.  Seal His Fate:  Wrap the cocoon in the same way you wrapped the body in tulle.  Cover the front and back of the figure with the web sheet you've created, stretching web around the sides of the body to create one complete 'sack'.   Remember to leave extra web fabric to run up to the point from which the sack will hang.  The web will not support any of the weight of the figure, but it needs to look like it's the element that's binding the body in place.

9.  Hang Him Up:   Choose a ceiling corner or point in a tree to hang your body from and hang him high!  Remember to support the figure with your durable fabric layer NOT from the web material - that just wont work.

10.  Embellish with Spiders:   Whether your unsuspecting victim was trapped by one large spider or an army of tiny villains, be sure to hang spiders in the area to guard their prey!   Your guests will gasp and groan at the spooky addition to your Halloween decor.


NOTES:  Lighting:  Consider back-lighting the piece to highlight the silhouette inside, or use black light for an eerie glow.  

VOILA:   Add a few large spiders, lots of spooky webbing, and a few webs and you have a statement making decoration for just a few bucks!  :)  


Friday, October 5, 2012

The Things that DON'T Go Bump In The Night - DIY Pest Repellents

When you purchase a 150+ year old home that has been over grown for years, and empty for several months, one expects to find LOTS of pests.  I thought I had adjusted my expectations, I was wrong!  Fortunately I developed an arsenal of all natural  DIY remedies to solve our household pest problem!

I should have known when we found a frog taking a swim in the toilet the first morning that I was in for a bumpy ride, but even that didn't clue me in to the breadth of the 'invasion'.  It turns out that LOTS of scary things DON'T go bump in the night - but prefer to creep around quietly while you sleep.  As we've battled back the creatures that CREEP in the night, (and tried to avoid filling the home with toxins while doing it) I've come up with a few DIY projects that may help you do the same.

Frogs:  I have no advice!  This little guy showed up only once, (Perhaps he was on the neighborhood welcome committee.) so after evicting him and ensuring the bathroom screens were firmly in place we saw no more of him.   It makes me wonder how long he had been living in there.  He should have been listed under 'existing tenants' on the disclosure I think.   As a preventative measure I hacked down a ton of ivy that looked charming climbing our brick facade, but also played host to lots of creepy crawlies.


Spiders:  This house was under full spider attack when we arrived.  The yard is somewhat wooded and very overgrown, encouraging LOTS of spiders in the area, and the windows (while new) had never been caulked leading to a full blown invasion.  First: Caulk your windows!  I know that sounds obvious, but these little dudes are skinny, and far more calculating then flying insects that bump against screens hoping to get lucky.  We took two approaches to fend off these beasties, one inside and one out.


Outside we used a product called Diatomaceous Earth, which is a natural substance that is made from ground fossils.  I know, this seems strange, but it works.   My understanding is that the powder is so fine that it penetrates the exoskeleton of spiders and other insects and that results in death.  :(  I honestly feel a bit bad about this, but at the time (after waking to a spider on the bed two nights in a row) I was desperate.  I sprinkled this stuff around the entire perimeter of the house both around the soil  level and up on the window sills.  My vigorous application left the house looking like it had dandruff, but I really think it helped cut back on the insects that found their way in.  Pros:  All natural and non toxic (It's even used IN dry food products in the US which is comforting but a bit scary at the same time.) Inexpensive and easy to apply.  Cons:  Appearance (It left the house looking like the 'before' guy in a dandruff commercial, but this could probably be avoided with a more careful application than my frantic dousing.)

I found this stuff to be very effective, all things considered.  I noticed a few dead ants even as I was spreading the stuff, and it did seem to create a barrier around the house.  I worried that it may wash away after a rain, but it seemed to stick around and maintain potency for quite a while. 

   ***As a side note, I wore a mask when putting this stuff out.  Any powder fine enough to explode spiders from the inside out seems like something I don't want in my lungs.  Please look for warnings on packaging, especially for indoor use or if you have kiddos.


Lemon Essential Oil, Citrus limon, Italy 5 ml
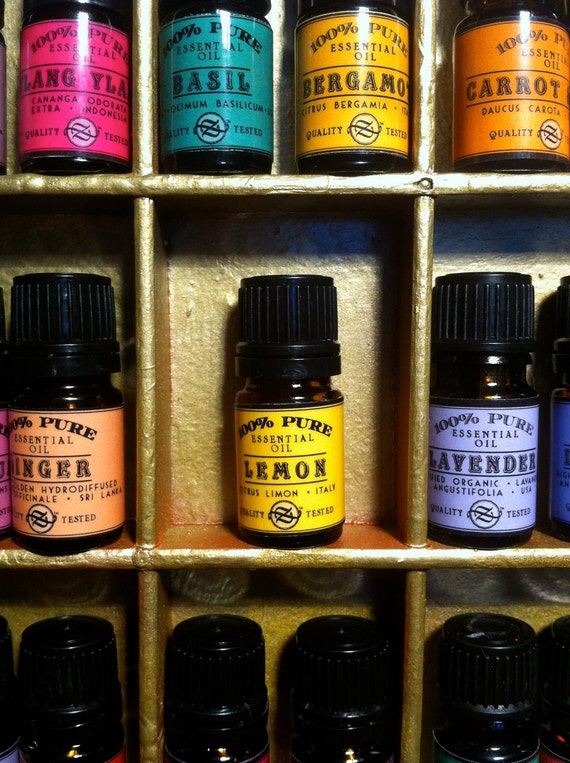
Inside I explored a lot of options before settling on what I figured was the most natural (and probably also least aggressive option).   As you might guess, certain natural oils repel spiders naturally.  Oils including those from citrus fruits, lavender, peppermint, citronella, cinnamon, tea trees and cloves can all be used to dissuade them from hanging around.  I chose to stay in the citrus family of oils since this is a scent my husband likes, and it smells inherently clean.   I bought several bottles of extract from Whole Foods and also some scented oils from Bath and body.   You can also find them on Etsy searching for postings like this

 I heated some in an oil warmer regularly (my thought was this was a good way to spread the smell throughout the house) and sprinkled drops along our base board heating.   I also BOMBED the area under our bed with oil - I was NOT willing to wake up to 8 beady eyes one more time!


Aside from sprinkling oil around the house you can also use the following recipe:

DIY Spider Repellant Spray:   Mix 5-8 drops of extracts or oils into a small spray bottle with HOT water and a drop or two of detergent or dish soap.  I found that the detergent and use of heat both allowed the oils to mix more evenly in the water.   Pros:  Inexpensive, natural and makes the house smell great.  Cons:  Effectiveness.  Probably not the most through or effective way to eliminate a major infestation, but over time it worked for us.  (And nobody grew a third arm from nasty chemicals.)

Spider Assassin: As a final layer of protection against the spiders, we (inadvertently) turned the dog into a trained spider assassin.  Every time she killed a spider I gave her a treat. Now, anytime she hears my trademarked 'I just saw a something creepy' squeal, she comes running.  I highly recommend this method of pest control.  

Millipedes:  In addition to the spider invasion we battled, we also found ourselves up against a particularly devious millipede variety. (Ok, I can't be sure if they are millipedes or centipedes, I googled it once and figured out the exact variety but the images scare me so I'm not going there again.)   Anyway, this little guy is long (2") and black and shiny with tiny legs you can't really see so it looks like it moves like a snake.  Millipedes are gross, but I realized this guy had an extra dose of gross when I squished one on my first night alone in the big abandoned, bug  infested, creaking, howling house.

It should be noted that as we moved into this place, anything that could have gone wrong HAD, so I was reacting to most things from a 'worst case scenario' standpoint.  Due to the age of the house and the level of disrepair and neglect I was pretty convinced that at some point we would have an electrical fire.   These thoughts were not completely unfounded since one the light switches in the great room sported a note that said 'Do not switch on, smells like smoke.'  Anyway, my first night alone in the new place and I encounter this slithering centipede in the hall outside the bedroom door.  I squealed (I don't remember making a sound, but playing the odds, that probably happened) and squished it, leaving the body for my husband to deal with in the morning.  Shortly after I stared smelling a VERY STRONG odor of burning plastic.  The kind of smell I would associate with an electrical fire.  I unplugged EVERYTHING I could find and waited in the dark all night for the spiders to carry me back to their lair.   It was only in the morning that we realized that the deceased centipede was actually the source of the smell.   It turns out these little guys spray when startled (like a skunk) and if you squish them they smell even worse.

The Remedy:  I can't say I have anything in particular in place to repel these guys.  Being insects with exoskeletons they fall victim to the Diatomaceous Earth, and perhaps they are dissuaded by our citrus smells as well. I can say that even our trained assassin has learned to stay away from these stinkers.  My best advise if you come across one,  carefully transport it outside without alarming it.  The lingering odor they cause makes killing them NOT worth it!

Our final Creature Feature is the Weevil! 
When we moved into this house we were relegated to a VERY primitive kitchen set up in a damp basement. Click HERE to learn more about how I keep pantry pests at bay. 

I hope that some of my research and remedies have been helpful to you!  Do YOU know any remedies that I should be using?  Comments welcome!

DIY All Natural Pantry Pest Repellant:

It's the time of year when all of the creepy crawly pests that are startling when spotted outside take it upon them selves to sneak inside where they can be downright terrifying.   Living in a 150 year old building on a wooded lot that stood largely unmaintained in recent years has presented us with LOTS of pests.  (click HERE for more information!.)

I've been fighting these pests with natural remedies to the best of my abilities, and have come up with some unique twists to good ol' "home remedies" that I'd like to share with you.  

When we moved into this house we were relegated to a VERY primitive kitchen set up in a damp basement.  As you might expect, this meant that keeping bugs away was a constant battle.  Shortly after we moved in I noted a HUGE weevil gathering taking place in the dog treat jar. - It was WAR! 

After a google frenzy I found that most people recommend throwing EVERYTHING away, bleaching everything in site, not keeping any dried foods stocked in the pantry for any length of time, and more harsh chemicals. None of those seemed like viable options, (Seriously, scrubbing my cabinets weekly is a rediculous suggestion!) so after some research I developed my own all natural pantry pest repellant (which has the added effect of keeping other creepy crawlies out of the area as well).

An Herb Sachet that smells great, and wont scream "We have a pest problem!" to even the most finicky of guests. 
 (And let's face it, the kind of person who would be offended when they found your bug repellant is the EXACT same person who would poke around in your pantry.)

This was a VERY easy project that involved items I already owned, herbs already in my pantry, and a quick trip to the bulk spice isle in Whole Foods.  

Instructions:  Assemble your ingredients and stuff them in your sachets.  Complex, right?  I know, I know.... but I do have some notes that I think are of value.  First, use the bulk isle at your grocery store.  If you are making 5 sachets, you only need 10 pieces of Star Anise - don't pay for a whole container.  Secondly, a note about ingredients.  I compiled this list based on various ingredients noted as being helpful when dissuading pests. The coriander was never specifically mentioned in anything I read, but it seemed like a similar scent that would have similar properties.  I've never tried the sachets without this ingredient, so I can't guarantee that they are part of the magic, but I do like the way they smell in the pantry if nothing else. Finally,  if you pull the bay leaves from the sachets, the remaining ingredients make GREAT mulled cider.  Since pest season and cider season are one in the same - I find this tidbit particularly charming.  :) 


Ingredients:
1.  Sachet:   I used some little pink sachets left over from a baby shower project.  Anything that would allow scent to penetrate would work:  nylons, thin cotton, tea bags, etc.  

2.  Peppercorn:  (8 to 10.)  This is a good way to use up the ones that inevitably escape as you fill a    grinder and roll all over the kitchen floor.  Gather them up and refresh your sachets next time.  

3.  Clove:  (A  Pinch).  Let's say 3-5 pieces.   

4.  Star Anise:  (2) I think spiders don't like these because some sort of uncanny valley phenomenon. 
5.  Cinnamon Sticks: (2 ) Ground would work I suppose, 
but the powder would escape your sachet. 
6.  Bay Leaves:  (2 or 3) I received a bay wreath last autumn, so I had LOTS of leaves laying around.  The more the merrier but 2-3 seems to be sufficient. 

7.  Coriander:  2 Pods.  


YOU'RE DONE:   Place these little wonders throughout your pantry cabinets and anywhere else where you'd like to keep the beasts at bay.  I've tucked them into my bathroom cabinet, in my coat closet, dresser drawers, etc.  The scent is delightful, and they are effective for 6 months at a minimum.  Enjoy!